AUS220 – LO 9
FM Synthesis in Ableton
My first production technique I want to research is the making of a ‘Future House’ Bass with FM Synthesis using Operator.
A Future House Bass is a Synth that follows the sound of being ‘Futuristic’ and of unique sound to other typical House Basses, the sound can be defined sometimes as having a detuned layer on it usually down -7 Semitones but sometimes other tunings work too. Here’s a preview of a well-known ‘Future House’ track that features this ‘Future House’ Bass which I’m going to be making.
Future House Bass in Operator:

I start off by adding Operator to an new Midi track, then coming up with a melody to use as we develop the sound more.

Starting with Oscillator 1 were going to use a 64 Square Wave.

Firstly I dropped the Sustain so I can keep just the pluckiness of the sound, then I added a Low-Pass Filter and went down to around 70 Hz. Then I put the Envelope up to 100% to benefit filter by coming out through the envelope we’ve got in the image above.

I then duplicated the first layer but added a EQ and used a High pass filter to focus the layer for on the highs, then added a chorus effect.

I then duplicated the layer again but this time added a Midi Effect called Pitcher, and set the pitch to +7 semi tones. This adds a cool detuned effect to the overall sound.
Side chain Compression in Ableton
What is side chain?
Side Chain Compression allows the producer to have a compressor react from a seperate signal to minimise clashing or phasing between the kick and other sounds on top of it, the main benefit is to let the Kick have room in the mix. Side chaining is only necessary on sounds that are being played at the same time as a Kick, the more compression you use will give more of that pumping feeling of the sound.
So in my session of Ableton I’ve got my Kick sample playing 4/4 and Operator as my main synth, the sound what is needing to be Side Chained.

I’ve started by Duplicating my ‘Kick’ channel which is acting as my signal for the compressor, then I muted this signal so it’s only ducking out that signal. I could actually use any sample if I thought that this kick sample didn’t duck out enough for me but it goes down to what sound you’re wanting to have come out of that synth or what is being side chained. Then I renamed the channel to Sidechain.

Once I added my Ghost Kick or signal to be side chained I added a Compressor from Audio Effects to the sound I want Sidechained.
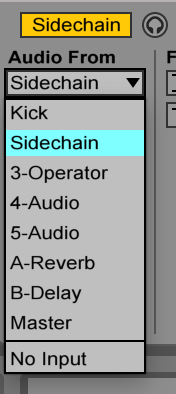
Then I need to choose where my side chain signal is coming from, in this case it is the Sidechain signal we created by duplicating a kick.

I then tweaked the Threshold to find the right spot where It isn’t pulling out to much sound but also not leaving to much in there, also by adding in the built in EQ gives a much cleaner effect to what is being ducked out.
There I have successfully Sidechained my synth to my kick and any other sound that I want to be side chained I can just copy this compressor or add another to the channel by receiving signal from the Signal or Ghost Kick.
Vocal Sampling in Ableton
For my third technique i’m going to learn vocal sampling, for starters I need to find a vocal sample I want to use and add it to a new Audio Track.

Once I did that I need to find the root note of the sample I am using, which will help soon.

In this case, my root note is E3.

Now that I know my sample is hitting an E note I deleted it, and dragged in a Sampler which is an audio instrument.
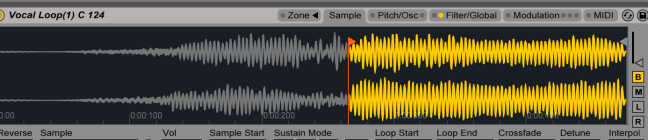
I then dragged my sample into sampler, I then used the little orange flag to choose a position in the sample which I would like it to play from.
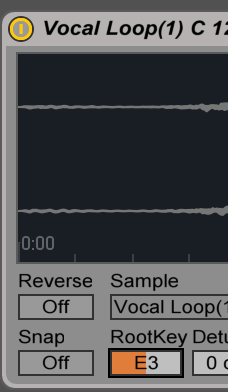
Then in Sampler I change the Root Note to what it is (E3), then will then give me the knowledge that every note I hit now will in fact be hitting the correct note and in the right key.

That’s all there is to it, after that I added some effects of Saturator and Reverb.
Sliding and Pitch Bending in Ableton
Coming from FL Studio, Pitch bending was very easy for me so I want to learn how to bend notes like I would in my old DAW (FL Studio).

So firstly I opened up Analog and chose a preset, Analog is found in Instruments. This is a 2 Oscillator virtual Analog Synthesiser.

So this preset I imported has a Macro control linked to it so you can turn up the pitch bending or ‘Glide’ by turning the Marco Knob labeled Glide. But with an empty preset of Analog you can switch on Glide and turn up the percentage amount to how much ‘Glide’ you want, Legato gives the feature that only the notes will slide when the Midi information crosses over the next note where without it will bend every note.
Manipulating Vocals in Ableton

So to start off the last production technique, I grabbed a Vocal sample and dragged it into a new Audio Track.
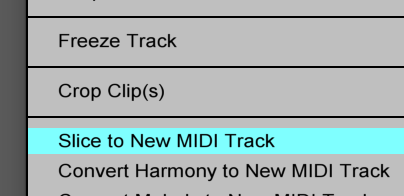

So then I used this cool feature and Sliced the vocals to a new Midi Track, here I was able to choose how much of the vocals I wanted to be sliced and how many samples I wanted. I chose ‘Bar’ to keep it quite simple but If you preferred you could just 16th Notes which would give you a lot more samples to play with.

Once that is finished you are given a Midi track like this, which now gives you the freedom to delete what the original vocals were saying and use your keyboard and piano roll to manipulate and create something new from all these different phrases which Ableton sliced up for us.

Then its a matter of playing on your keyboard or drawing in notes to create something to your liking and add further FX to create a sound that appeals to you.
References
Allison, J. (2015). Side Chain Compression in Ableton Live Tutorial. Austinabletontutor.com. Retrieved 18 March 2016, from http://austinabletontutor.com/side-chain-compression-ableton-live/
ARTFX STUDIOS,. (2016). Chopping vocals like the pros! Skrillex / Feed Me style – Ableton Tutorial Tuesday. Retrieved from https://www.youtube.com/watch?v=dVZD9WgBXsg
DJ Tech Tools,. (2016). Processing And Playing Vocal Samples Like An Instrument. Retrieved from https://youtu.be/Wpxca-6W4iI
Playing Vocal Samples Like An Instrument In Ableton – DJ TechTools. (2015). DJ TechTools. Retrieved 18 March 2016, from http://djtechtools.com/2015/06/21/playing-vocal-samples-like-an-instrument/
Production Music Live,. (2016). roducing that Future House Bass Bassline in Ableton Live 9 only – Sound Design Tutorial Tchami. Retrieved from https://www.youtube.com/watch?v=MWVF4ilnwnQ
Bend Between Notes with Glide in Analog – New Point Blank Tutorial | Ableton. (2016). Ableton.com. Retrieved 19 March 2016, from https://www.ableton.com/en/blog/make-juke-beat-ableton-drum-machines-new-tutorial-point-blank/
Platinum Loops,. (2016). Ableton Live Tutorial – How to Manipulate Vocal Samples. Retrieved from https://www.youtube.com/watch?v=9vkXKSw2gTk
